

LCDs are often used in microcontroller projects. Most used are these green character displays with two or more rows to display menus, status or debug messages. With mass production of mobile phones, color LCDs get that cheap, that they can be used as replacement.
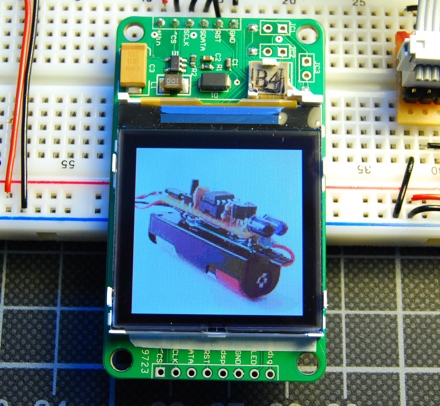
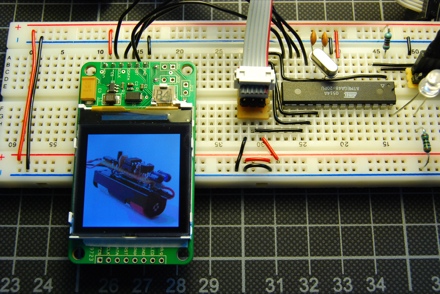
Some time ago I ordered a Nokia 6100 LCD including breakout board from Sparkfun. To test the display, I hacked a kind of small digital picture frame, that fetches pictures from Flickr.
Nokia 6100 LCD
The Nokia 6100 display is able to display 130 by 130 pixels with 8-bit or 12-bit color (4096 colors) and it has a LED backlight. It is controlled with Serial Peripheral Interface Bus (SPI). That means it needs only 3 wires for controlling it.
- SDATA, serial data
- SCLK, serial clock
- CS, chip select
- RST, not part of SPI, but needed to reset the display
There are several sources out there, that uses this display, so it should not have been a problem to get the display running. But it turns out that it wasn’t that easy. First, there are different controllers on the display. One is the Philips PCF8833 Chipset, the other one is the Epson S1D15G10. So first you have to find out, which controller your display uses. Mine uses the Epson controller, even if some sources point out, that displays with a brown cable connector are using Philips controllers.
The breakout board that Sparkfun provides is handy, as you don’t have to solder these really tiny connectors. Additionally the breakout board has a DC/DC step up power converter to drive the LED backlight. That means you can power the display from a single 3.3V source and don’t have to use one 3.3V for the logic and another 5-7V for the backlight.
Schematic
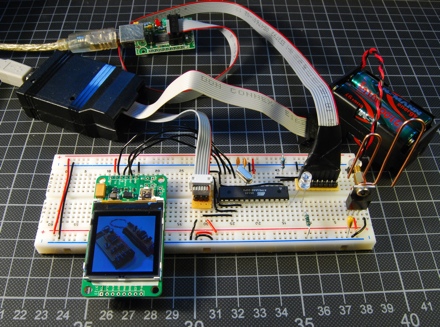
To control the display I used an ATmega48. It is rather cheap (1.50€) and has enough SRAM to load some code and font data.
I used a TS317 power regulator to provide the 3.3V needed for the display. The TS317 is a derivation of the popular LM317. As it is a linear power regulator, it burns continuously power to reduce 5V to 3.3V. It’s really getting hot. A switching regulator would be more efficient to do that. The two resistors are used to control the voltage output. The best relation that I could get of my resistors is 220R to 330R, which results in 3.13V. That’s not 3.3V but turned out to be enough.
The breakout board for the display has two rows of connectors that you can use. One uses the integrated step up power regulator, the other one does not. That means you can provide different power sources for the display, which is the way to go if your display catches a lot of noise. Mine did not so I was lucky with the simpler socket at the top of the display.
To transmit data from a PC to the controller you will need a kind of USB-2-RS232 converter, that is able to work with 3.3V as the ATmega48 uses the power source as the display.

Software
To have some data to play with, I decided to fetch images from Flickr. The API is accessible in almost any language, I chose Beej’s Python Flickr API. To use the API you need an API key for your application. Actually fetching images takes only a couple of lines. After downloading, the image has to scaled down and transformed. There is another library for python that handles these task perfectly, it’s Python Imaging Library (PIL). The last thing needed to send the scaled image to the controller and the display is pySerial, a library to talk to the serial port.
The code to control the display is based on Sparkfun’s latest ATmega8 sample. I slightly modified it by adding some code to use the reset line of the display. Without it the display did not work reliable. To receive data, I added a small USART module.
Conclusion
First I tried to get this running on my Arduino. There is a sample in the Arduino Playground, but that did not work for me. The display lights up and dimms out shortly after displaying some color bars. The sample code from Sparkfun was a better starting point.
There are some issues left. The display seems to pump. The brightness goes up and down every other second. It is not related to the amount of white pixels on the display. I haven’t figured out, how to solve this. Another issue is the slow transmission and display of the image. The controller has not enough RAM to buffer the image so it displays every pixel as it receives it. The result is as if you are browsing the web 1998 with a 9600 baud modem.
But at least it worked and it was my first time playing with an LCD. I can haz display!
Links & Downloads
- nokia_lcd, Source and schematic
- Sparkfun’s Color LCD, with a lot of sample code
- Datasheet Philips PCF8833
- Epson S1D15G10
- Nokia Display with an Atmel-AVR
- Flickr API

Absolutley awesome implementation. I cant wait to order a module and tinker around. chances are throwing your code on a 168 (slightly more $, but still cheap) would get a bit better preformance. oh, the light flickering is probably just your power supply, unable to handle transient’s. try throwing a large cap on the 3.3v (or in your case the 3.1v) line.
LikeLike
Dane,
thanks, I will try that.
Cheers,
Alex
LikeLike
Just great! Gave me good enough to try out on the weekend!
LikeLike
Forgot to mention – thanks a ton!! :-)
LikeLike
Sparkfun supplies a link on the LCD’s page called “The holy grail forum posting for this Nokia type LCD.” The second post on that linked page might have the answer:
“It’s internal chargepump responds to light if the controller is not covered. This will cause the display to go ‘on’ as if there is to much voltage applied. “
LikeLike
Hi mate
Looks great!
Im thinking about making the same thing. If I buy the Mega168 or a better MCU as someone suggested.. can I use your exact circuit diagram and program with only the chip different?
I dont want to get the slow loading proble.. (and hopefuly not hte flicker either)
regards
Mike
LikeLike
or even a mega 162? (As i cant find mega168 from my supplier)
LikeLike
Hi Michael,
ATMega48, 88, 168 and 328 are all pin compatible. The 162 is not.
Cheers,
Alex
LikeLike
Want to try this with 8051 microcontroller.
LikeLike
here i found nkoia 6610 lcd and break out board
Nokia 6610 color LCD
http://onlinetps.com/shop/index.php?main_page=product_info&cPath=69_107&products_id=432
Nokia 6610 LCD Connector Breakout board
http://onlinetps.com/shop/index.php?main_page=product_info&cPath=66&products_id=700v
Nokia 6610 LCD Display Connector
http://onlinetps.com/shop/index.php?main_page=product_info&cPath=68_91&products_id=482
LikeLike
Why code is only on Python? I want to programm it on AVR GCC is this posible? What kind of controller is used on this Nokia LCD? I read there can be few variants: Philips and other.
LikeLike
Python is only used to fetch the images from flickr.
LikeLike
Hi Alex
regarding the flickrApi :
in your code, you have not used the secret , is it optional?
Also in this syntax: url = “http://farm%s.static.flickr.com/%s/%s_%s_m.jpg” %
(photo.get(“farm”), photo.get(“server”), photo.get(“id”), photo.get(“secret”))
do we need to change the parameters for farm, server, id, and secret?
Thanks in advance for clarifying the above. Will try to get a display soon. Also is there any way of interfacing directly from a conventional serial port with TTL logic (-12v etc) to the mc? I am also wondering if I use a USB to serial converter can i just connect the TX and RX signals
directly to the mc without worrying about voltage levels.
Thanks so much for this very nice project idea, getting excited to implement this.
Best regards
Anjan
LikeLike
Hi Anjan,
to use the flickr API you have to use an API-key. You can request that at flickr.com. Then insert the key in the python script. Then insert your flickr ID, the rest should work unchanged.
If you have a USB-to-serial, it should work. Check the voltage before. Or take a look at FTDI-cable, these are best for this.
Cheers,
Alex
LikeLike
Hi Alex
Thanks very much for your response. I have already received the API-key from flickr and also received the secret with it , hence i was not sure if it was required.
thanks for the suggestion with the FTDI cable. I will try to order that from sparkfun
cheers
Anjan
LikeLike
Hi Alex
Managed to get my FTDI breakout board from Sparkfun. Just a quick question: Should I macth the TXD and RXD pin of the mega (pin 3) with that of the FTDI breakout board? The reason I am asking this is because sometimne they label it the reverse on boards to make it easier for the MC connection. Sorry for asking this silly question but wanted to make sure before i connect up. very much appreciate your help.
Cheers
Anjan
LikeLike
i want to interface nokia 6100 colour LCD with arduino running ATMEGA8. Please help me with interfacing diagram.
LikeLike
Yes, you can, but you may have to adapt the code a bit.
LikeLike
what modification?? can you please explain??
LikeLike
I also wanted to know if the pins of the display can be directly connected to the MCU or if there should be anything in between the the Mcu and the display.. I just have a fresh 6100 LCD display with me….
LikeLike