

This time no hardware hacks. At least no selfmade hardware.
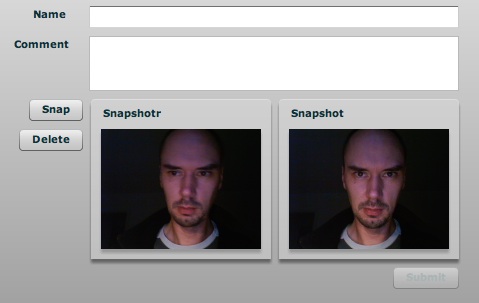
Lately I saw websites that used Adobe flash to get access to my local webcam. I thought it would be fun to have someone take a snapshot of himself and post it on my site.
And it is a fun project to learn some Adobe flex.
To be honest, I am new to flex and php as well. I am sure that it contains bugs and security issues. If you find some, then please let me know. This is a proof of concept, if you read on and try it on your own site, you do it on your own risk. You have been warned ;-).
Source
Here are some source code snippets. There are three parts:
- camcomment.mxml, the flex application to take the snapshot
- upload.php, the script to receive the image
- a php snippet to include in wordpress to display the snapshot and the comment
The flex application consists of main application, a class for the webcam access and a class for base64 encoding.
The main application is described in an article on how to upload binaries with an Adobe Air application. It works great, except that I was not able to transfer the image to the server, as I could not get hold of the data with php. And php was the only thing available on my blog site. So I modified the code to encode the image with base64. That way I could use simple form processing on the php side.
[...]
      private function init():void {
        webCam = new WebCam(160, 120);
        var ref:UIComponent = new UIComponent();
        preview.removeAllChildren();
        preview.addChild(ref);
        ref.addChild(webCam);
      }
      private function enableSubmit():void {
        if ((nameField.text.length > 0) && (commentField.text.length > 0) &&
          (imageViewer.getChildren().length > 0)) {
            submit.enabled = true;
          }
          else {
            submit.enabled = false;
          }
      }
      private function takeSnapshot():void {
        imageViewer.visible = true;
        imageViewer.width = preview.width;
        imageViewer.height = preview.height;
        var uiComponent : UIComponent = new UIComponent();
        uiComponent.width = webCam.width;
        uiComponent.height = webCam.height;
        var photoData:Bitmap = webCam.getSnapshot();
        var photoBitmap:BitmapData = photoData.bitmapData;
        uiComponent.addChild(photoData);
        imageViewer.removeAllChildren();
        imageViewer.addChild(uiComponent);
        state.text = "";
        enableSubmit();
      }
      private function uploadSnapshot():void {
        if (imageViewer.getChildren().length > 0) {
          var uic:UIComponent = imageViewer.getChildAt(0) as UIComponent;
          var bitmap:Bitmap = uic.getChildAt(0) as Bitmap;
          var jpgEncoder:JPEGEncoder = new JPEGEncoder(75);
          var jpgBytes:ByteArray = jpgEncoder.encode(bitmap.bitmapData);
          state.text = "starting upload ...";
          uploadPhoto(jpgBytes);
          state.text = "upload done";
        }
      }
      private function deleteSnapshot():void {
        imageViewer.removeAllChildren();
        enableSubmit();
        state.text = "";
      }
      private function uploadPhoto(imageData:ByteArray):void {
        var request:URLRequest = new URLRequest("https://tinkerlog.com/uploads/upload.php");
        var vars:URLVariables = new URLVariables();
        vars.name = nameField.text;
        vars.comment = commentField.text;
        vars.bindata = Base64.encodeByteArray(imageData);
        request.method = "POST";
        var loader:URLLoader = new URLLoader();
        loader.addEventListener(Event.COMPLETE, uploadPhotoHandler);
        request.data = vars;
        loader.load(request);
      }
      private function uploadPhotoHandler(event:Event):void {
        trace("server: " + event.target.data);
        state.text = "Response from server: " + event.target.data;
      }
[...]
The following is the code to receive the image data and the comment. There are only basic checks in place. As already noted, the binary data is transmitted as base64 encoded string and has to be decoded. If the image is smaller then 10.000 bytes, it gets stored in a file named snapshot.jpg. Comments are saved to a file named comments.txt. The script returns the filesize which is then displayed in the Snapshot application.
<?php
  if ($_REQUEST["bindata"] === NULL) {
    echo "missing parameter.";
  }
  else {
    $img_data = base64_decode($_REQUEST["bindata"]);
    $name = $_REQUEST["name"] === NULL ? "anonymousn" : $_REQUEST["name"] ."n";
    $name = strip_tags($name);
    $comment = strip_tags($_REQUEST["comment"]) . "n";
    $img_size = strlen($img_data);
    if ($img_size < 10000) {
      $img_filename = "data/snapshot.jpg";
      $comment_filename = "data/comment.txt";
      unlink($img_filename);
      unlink($comment_filename);
      $img_file = fopen($img_filename, "w") or die("can't open file");
      fwrite($img_file, $img_data);
      fclose($img_file);
      echo "$img_size bytes uploaded.";
      // write comments
      var_dump($comment);
      $comment_lines = explode("r", $comment);
      var_dump($comment_lines);
      $comment_file = fopen($comment_filename, "w");
      fwrite($comment_file, $name);
      foreach ($comment_lines as $line) {
        fwrite($comment_file, $line . "n");
     }
     fclose($comment_file);
    }
    else {
      echo "image too big.";
    }
  }
?>
The following snippet is directly hacked into the sidebar.php. Search for the line <?php endif; ?> and paste it below. It just renders a static link to the snapshot.jpg and pulls the lines out of the comments file to display them.
<li>
<h2 class="widgettitle">Snapshot</h2>
 $lines[0] says: ";
echo "$lines[1]";
}
?>
$lines[0] says: ";
echo "$lines[1]";
}
?>
</li>
Demo
Ok, time for some demo.
Insert name and comment and take a snapshot. Reload the page and see, if it is displayed in the sidebar. The comments and picture are overwritten by the next one who tries this, so nothing is archived.
[kml_flashembed movie=”/wp-content/uploads/camcomment.swf” height=”314″ width=”480″/]
Note: You have to have a web cam attached to your PC or Mac and you have to allow the access to the camera.
Conclusion
Posting so much source code into the post is really a pain. WordPress users know what I am talking about. But over all, it is always nice to have something new on the blog to play with. If someone has improvements, be it security fixes, bug fixes or a nice skin for the application, just let me know.
And please stay well-dressed when you take a snapshot ;-)
Links
- Adobe Flex3
- Take a webcam snapshot in Flex 2.0
- Uploading files to a server from an Adobe AIR application
- Base64 De- and Encoder in Actionscript
- Plugin to embed flash in wordpress posts: Kimili Flash Embed
Downloads
- Source files (flex and php) snapshot.zip

Very good tutorial. Thank you! Keep up the good work. I’ve used flash and fms for months to do that. Time to dig into flex.
LikeLike
Can you put a C# asp.net code for the upload?
Thanks,
Zane
LikeLike
Excelent tutorial. File uploading from Flex has some important limitations. After having read a lot of ideas from blogs and forums, I finally reached your blog.
You seem to have combined the necessary pieces in order to achieve the best solution. Excelent work!
LikeLike
Great blog, just one question. I used your code but i can’t find where is the snapshot.jpg pic is saved. I actually think it is not saved at all, but how can i save it?
LikeLike
Will,
the snapshot is sent to the server. On the server side the php script is used to receive it and save it to disk.
Cheers,
Alex
LikeLike
Here is a list of motion detection resources resources for Flash developers, with sources, theory, samples, etc… http://www.ugolog.com/pages/webcam-motion-detection-for-flash-flex-and-csharp
LikeLike
hi,
how can i save image on local hard drive
LikeLike
Actually, contrary to the main post remark of “It works great, except that I was not able to transfer the image to the server, as I could not get hold of the data with php” – you can!
I guess not many of you guys out there that PHP nuts like myself, but if you want to get a data piped into a PHP script just access it like so:
No need for hacking around with converting stuff to Base64, just take the original Adobe tutorial that posts to a Perl script and update your code to use ‘php://input’ … and if you want to throw name/value pairs, then append then to your URL in the querystring.
LikeLike
Thank you for this, by far the most straight forward flex webcam solution.
I am using it for scan qrcode:
http://blog.wensheng.com/2009/10/poc-online-barcode-qrcode-scan-with.html
LikeLike
hi!!
nice job with the webcam but i still have a cuestion:
it apears that the webcam initialization obtains every installed twain source (screen capture driver, webcam, etc.) similar to a webcam. in my case it doesnt let me choose which one i want to use. i there a way to select a device from the source code or get a list to choose from?
tnks and keep the good work.
LikeLike
Thanks alot for posting this man, my stuff got going thanks to ya :)
LikeLike
Here a update to cofigure easely the image size an quality…
as3 code:
0) && (commentField.text.length > 0) &&
(imageViewer.getChildren().length > 0)) {
submit.enabled = true;
}
else {
submit.enabled = false;
}
}
private function takeSnapshot():void {
imageViewer.visible = true;
imageViewer.width = preview.width;
imageViewer.height = preview.height;
var uiComponent : UIComponent = new UIComponent();
uiComponent.width = webCam.width;
uiComponent.height = webCam.height;
var photoData:Bitmap = webCam.getSnapshot();
var photoBitmap:BitmapData = photoData.bitmapData;
uiComponent.addChild(photoData);
uiComponent.scaleX = uiComponent.scaleY = scaleIt;
imageViewer.removeAllChildren();
imageViewer.addChild(uiComponent);
state.text = “”;
enableSubmit();
deleteButton.enabled = true;
}
private function uploadSnapshot():void {
if (imageViewer.getChildren().length > 0) {
var uic:UIComponent = imageViewer.getChildAt(0) as UIComponent;
var bitmap:Bitmap = uic.getChildAt(0) as Bitmap;
var jpgEncoder:JPEGEncoder = new JPEGEncoder(jpegQual);
var jpgBytes:ByteArray = jpgEncoder.encode(bitmap.bitmapData);
state.text = “starting upload …”;
uploadPhoto(jpgBytes);
}
}
private function deleteSnapshot():void {
imageViewer.removeAllChildren();
enableSubmit();
state.text = “”;
}
private function uploadPhoto(imageData:ByteArray):void {
var request:URLRequest = new URLRequest(“./script/php/upload.php”);
var vars:URLVariables = new URLVariables();
vars.name = nameField.text;
vars.comment = commentField.text;
vars.bindata = Base64.encodeByteArray(imageData);
request.method = “POST”;
var loader:URLLoader = new URLLoader();
loader.addEventListener(Event.COMPLETE, uploadPhotoHandler);
request.data = vars;
loader.load(request);
}
private function uploadPhotoHandler(event:Event):void {
trace(“server: ” + event.target.data);
state.text = “Thank you / Danke: ” + event.target.data;
}
]]>
PHP code:
<?php
if ($_REQUEST["bindata"] === NULL) {
echo "missing parameter.";
}
else {
$img_data = base64_decode($_REQUEST["bindata"]);
$name = $_REQUEST["name"] === NULL ? "anonymousn" : $_REQUEST["name"] ."n";
$name = strip_tags($name);
$comment = strip_tags($_REQUEST["comment"]) . "n";
$img_size = strlen($img_data);
if ($img_size
maybe u like it
greetings from Bonn, ger
LikeLike
the download does not have the complete files in them….pls add them
LikeLike
great tutorial. But we are ignoring that the stream and image is mirror image. How can we solve this issue. I tried
webCam.scaleX = -1;
webCam.x = webCam.width + webCam.x;
to solve it. But every time the image width is coming double the orginal. Is there any other way to do it. Please help .
LikeLike