Christmas is coming closer, so here is my contribution to put you in the right mood.
It is a blog hitcounter, that rings a bell. Literally. It puts a smile on your face, every time someone hits your blog. And it is a great way to annoy your colleages or your girl friend.
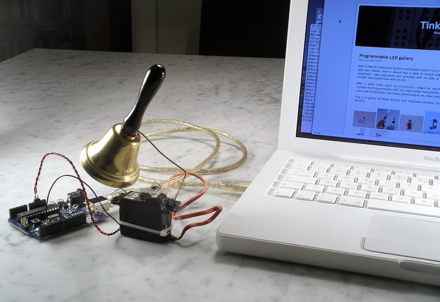
It consists of an Arduino board, a bell, a servo and a couple of lines of code in c, python and php.

Materials
So what is needed?
- Arduino Board. I have an Arduino Diecimila from Adafruits. In the meantime there are really cheap and handy clones out there, e.g. the bare bone board from Modern Devices, especially if you want to use them on a breadboard.
- A servo motor. Any servo will do. I took an old one that was used in my former hobby.
- A bell. Prefarably one that is small enough to shake it with the servo.
- Two paperclips. A large one to hold the bell and a small one to build the actuator to ring the bell.
- A website. In fact it hasn’t has to be a website or a blog. Actually everything that can be counted, will work.
- A PC or a Mac to connect the Arduino board with the blog or website.
- Wires.
Assembly
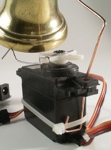
The bell is held by a strong paperclip. The small paperclip is used to form a kind of arm that is atached to the servo motor.


Schematics
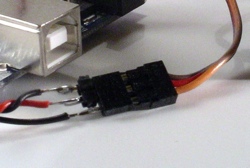
There is no real schematic. Just attach the servo motor to the Arduino. The servo has three wires:
- yellow or orange: signal
- red: VCC
- brown: GND
The red and the brown one are attached to the according pins on the Arduino. The orange one is wired to pin 2. It will signal the servo in which direction to turn.

Software
The software stack has three parts. First part is the counter embedded in my blog. Second is the glue code, running on my mac to fetch the counter and to update the Arduino. Third is the Arduino sketch itself to control the servo motor.
This is a small php snippet to write a counter into a text file. I have included it into one of my wordpress templates. That’s not very smart, but for now my traffic is not that high so this should not be a problem.
<?php  $count_my_page = ("hitcounter.txt");
$hits = file($count_my_page);
$hit = trim($hits[0]);
$hit++;
$fp = fopen($count_my_page , "w");
fputs($fp , "$hit");
fclose($fp);
echo $hit;
>
Here is the second part, the python snippet to fetch the counter. It opens a connection to the saved hitcounter.txt and loads the content, which is the actual value of the counter. This counter is compared with the previous fetched value. If it differs, than it has an incident to report. The delta is written as byte to the serial port and sent to the Arduino. That is done every ten seconds.
#
# fetch counter
#
import time
import urllib
import serial

# usb serial connection to arduino

ser = serial.Serial(
   '/dev/tty.usbserial-A4001JAh', 9600)
myUrl = 'https://tinkerlog.com/hitcounter.txt'

last_counter = urllib.urlopen(myUrl).read()
while (True):
  counter = urllib.urlopen(myUrl).read()
  delta = int(counter) - int(last_counter)
  print "counter: %s, delta: %s" % (counter, delta)
  ser.write(chr(ord(chr(delta))))
  last_counter = counter
  time.sleep(10)
Last part is the Arduino sketch. It is mainly based on the code that I found at the ITP Physical Computing. In the loop you see the reading of the delta value provided by the python script. If there are some rings to perform, a little state machine takes control of how far and when to move the servo arm. The servo motor is controlled with PWM, pulse width modulation. That’s the last part of the sketch. How far the servo arm turns can be adjusted with the min- and maxPulse values.
/*
 * Arduino XMAS Blog hitcounter
 * https://tinkerlog.com/
 *
 * Reference:
 * - Servo control from an analog input
 *   taken from http://itp.nyu.edu/physcomp/Labs/Servo
 *
 */
int servoPin = 2;      // control pin for servo motor
int minPulse = 1200;   // minimum servo position
int maxPulse = 1700;   // maximum servo position
int pulse = 0;         // amount to pulse the servo
int rings = 0;         // amount of rings
long nextMillis = 0;   // the time to pass before the next action
long lastPulse = 0;    // the time in milliseconds of the last pulse
int refreshTime = 20;  // the time needed in between pulses
int state = 0;         // for the state machine

void setup() {
  pinMode(servoPin, OUTPUT);  // Set servo pin as an output pin
  pulse = minPulse;           // Set the motor position value to the minimum
  Serial.begin(9600);
}

// define states for the state machine
#define PULSE_ON       0
#define WAIT_PULSE_ON  1
#define PULSE_OFF      2
#define WAIT_PULSE_OFF 3

void loop() {

  // read the rings
  if (Serial.available() > 0) {
    rings += Serial.read();
    Serial.println(rings);
  }

  // state machine to control, which action to perform
  if (rings > 0) {
    switch (state) {
      case PULSE_ON:
        pulse = maxPulse;                // send servo to max position
        nextMillis = millis() + 300;     // wait 300 ms
        state = WAIT_PULSE_ON;
        break;
      case WAIT_PULSE_ON:
        if (millis() > nextMillis) {
          state = PULSE_OFF;             // time is up
        }
        break;
      case PULSE_OFF:
        pulse = minPulse;                // send servo to min position
        nextMillis = millis() + 1000;    // wait 1 second between two rings
        state = WAIT_PULSE_OFF;
        break;
      case WAIT_PULSE_OFF:
        if (millis() > nextMillis) {
          state = PULSE_ON;              // time is up
          rings--;                       // one ring is done
        }
        break;
      }
  }

  // pulse the servo again if the refresh time (20 ms) have passed:
  if (millis() - lastPulse >= refreshTime) {
    digitalWrite(servoPin, HIGH);   // Turn the motor on
    delayMicroseconds(pulse);       // Length of the pulse sets the motor position
    digitalWrite(servoPin, LOW);    // Turn the motor off
    lastPulse = millis();           // save the time of the last pulse
  }

}
Conclusion
It is the first time, that I built something, that has moving parts. That’s my first step to bridge the gap between the virtual and the real world. And it was really easy, the code is straight forward. Also most of the parts were in my trash bin, except the bell. Putting everything together and waiting for someone to hit my blog was fun.
Side note:
- Me, excited: “Did you hear that? There was another one!”
- My girlfriend: “I k-n-o-w a-l-r-e-a-d-y!”

Action
Ok, time for some action.
BTW, the fabulous soundtrack used in this video is free and can be found here: Wikipedia Jingle Bells, performed by the Festival Speech Synthesis System‘s “singing-mode”.
Links
- Arduino, official site
- Arduino servo control
- Real Bare Bone Board at Modern Devices
- Arduino Diecimila at Adafruits
More pictures at Flickr.


Love it! I’m going to build it!
LikeLike