

BlinkM is a smart LED, developed by Tod E. Kurt from ThingM. In a way it is a cousin of the Programmable LED. It is a microcontroller with an attached RGB LED. The idea is to implement PWM to control the color and brightness of the LED and put it in the controller. That means you have an abstraction level to make your programming easier. You can simply order “fade to red” or “fade to blue”.
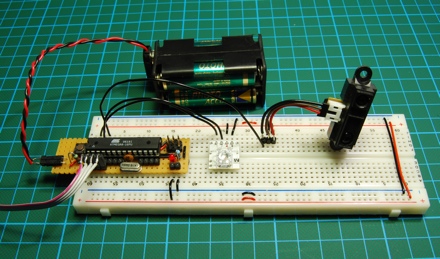
As a demo, I built a “nervous” BlinkM. It is getting nervous, if something moves in its view. And the more it moves, the more it gets nervous.
It consists of my Boarduino clone, a Sharp GP2D12 range sensor and a BlinkM. The Arduino reads the range of the range sensor and computes a value for the nervousness.
Talk to the BlinkM
Interfacing an Arduino with the BlinkM is easy as the BlinkM comes with lots of sample code. You just have to copy an include file (BlinkM_funcs.h) and place it beside your Arduino sketch and include it. All the I2C stuff is taken care of.
After initializing the BlinkM you can send commands to it. You can, e.g.
- fade to a color, defined by RGB
- fade to a color, defined by HSB
- set fading speed
- write a script
- play a script
Code
My two sketches are really simple. One changes the color, the other changes the frequency. Here is the code for the first one.
/*
 * Nervous Blinkm
 * Change the color depending on range changes
 * 2008/03/14
 * http://tinkerlog.com
 */

#include "Wire.h"
#include "BlinkM_funcs.h"

#define RANGER_PIN 3              // pin for the sharp gp2d12 range sensor
#define DELTA_THRESHOLD 10        // threshold for the range sensor
#define MAX_RANGE_CHANGE 50       // max range change that can be detected
#define CALMED_HUE 172            // hue value for calmed state

int blinkm_addr = 0x10; // the address we're going to set the BlinkM to
int distance = 0;
int oldDistance = 0;
int nervous = 0;
int delta = 0;
byte i = 0;

void setup() {
  BlinkM_begin();
  BlinkM_setAddress(blinkm_addr);
  Serial.begin(19200);
  byte rc = BlinkM_checkAddress(blinkm_addr);
  if (rc == -1) {
    Serial.println("rnno response");
  }
  else if (rc == 1) {
    Serial.println("rnaddr mismatch");
  }
  BlinkM_stopScript(blinkm_addr);
  BlinkM_fadeToHSB(blinkm_addr, CALMED_HUE, 0xff, 0xff);
  BlinkM_setFadeSpeed(blinkm_addr, 0x10);
  nervous = 0;
}

void loop() {

  // do 4 samples of the distance to reduce the jitter of the range sensor
  distance = 0;
  for (i = 0; i < 4; i++) {
    distance += analogRead(RANGER_PIN);
    delay(10);
  }
  distance = distance >> 2;
  Serial.print("distance: ");  Serial.print(distance);

  // compute the distance change
  delta = min(abs(oldDistance - distance), MAX_RANGE_CHANGE);
  // sum up (only if delta is noteable)
  nervous += (delta > DELTA_THRESHOLD) ? (delta - DELTA_THRESHOLD) : 0;
  if (nervous > CALMED_HUE) {    // limit the nervousness
    nervous = CALMED_HUE;
  }
  Serial.print(", nervous: ");  Serial.println(nervous);

  // In HSB the hue 172 stands for blue and 0 stands for red.
  // So subtracting the nervous value of the initial hue (blue) results in:
  //   "more nervous" --> "more red"
  BlinkM_fadeToHSB(blinkm_addr, CALMED_HUE - nervous, 0xff, 0xff);
  oldDistance = distance;
  nervous = nervous * 0.9;       // reduce the nervousness with every cycle
  delay(50);
}
Demo
Unfortunately it is not possible to combine the two sketches into one to control the color and the frequency.
Conclusion
The BlinkM is a cute little circuit. It has some computing power on its own and a real bright RGB LED. It is easy to program and you don’t have to bother about PWM. You can even script it. On the other hand it could get pricy if you want to make something that needs more devices than a hand full.
Links
- BlinkM
- ThingM, the makers of BlinkM
- Shop a BlinkM at Sparkfun
- Programmable LED
- Sketch to change the frequency, nervous_blinkm_freq.pde

“It is not possible to combine the two sketches into one to control the color and the frequency.”
Why not?
LikeLike
The BlinkM has built-in scripts that let the LED blink. While one of these scripts runs, you can control the speed of that script. That makes it blink faster. And you can control the fading speed. That makes it fading faster or slower. But the color can not be changed while this script runs.
Another option would have been to program the blinking and the colors on our own without the advanced features of the BlinkM, but that would have made the sketches more complex.
LikeLike
I see! Thanks.
LikeLike
Hi there.
I’v started a little open source project, the goal is to write an open source firmware for blinkm (or any atmel + 3 leds).
http://code.google.com/p/codalyze/wiki/CyzRgb
Matteo
LikeLike
My two sketches are really simple. One changes the color, the other changes the frequency. Here is the code for the first one.
Did I miss the second one?
Can I use just one if I don’t want the range side of it?
Thanks
LikeLike
Hi Rob,
I uploaded the missing sketch.
Cheers,
Alex
LikeLike
This is exactly what I was looking for. I managed to use an ultrasonic rangefinder to dim a regular led using Map Value, but I didn’t know how to do the same with a blinkM.
Two things:
Do you think it’s possible to do the same thing with three Ping))) ultrasonic sensors (which work pretty much the same as your ir sensor), each one controlling the brightness of one lamp on the blinkm? Is that too much stuff to stick on one arduino? How about 4- I have a bunch of uv leds too and it would be cool to have a uv phase.
LikeLike
Hi Wiley,
that should be possible. The Arduino has 6 analog inputs, that you can use. Processing speed will not be an issue, I think.
Cheers,
Alex
LikeLike